Troubleshooting: Why Windows Server is Failing to Release DHCP Lease

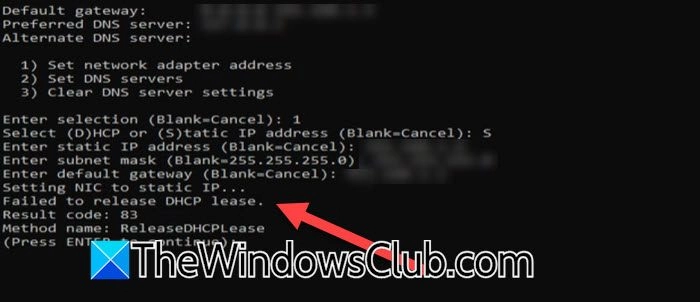
When attempting to set a static IP address in Windows Server Core Edition via the Command Prompt, users may encounter an error stating "Failed to release DHCP Lease." This problem can occur when making modifications to the network adapter settings. Here, we’ll explore various workarounds and solutions to resolve this issue.
Solutions to "Failed to Release DHCP Lease"
1. Check for Server Updates
Issues in network settings may stem from bugs in the operating system version you are using. While there’s no official confirmation of this, checking for available updates might help. Navigate to Settings, then Update & Security, and select Check for updates. Install any updates that are found, reboot your server, and see if the error persists.
2. Force Change the IP Address
If no updates are available, you can manually change the server’s IP address through the command line interface (CLI). If you received an error message previously, press Enter to continue, then open PowerShell (usually option 15). To proceed, enter Get-NetAdapter to list all the network interface cards and their aliases.
If there are multiple aliases and you’re unsure which to configure, run ipconfig /all to find the appropriate content. To remove the current IP address from the Ethernet interface, use the following command:
Remove-NetIPAddress -InterfaceAlias Ethernet -confirm:$FalseBreakdown of the command:
- Remove-NetIPAddress: Removes the specified IP address from the network interface.
- InterfaceAlias Ethernet: Specifies the network interface (in this case, Ethernet) to remove the IP address from.
- confirm:$False: Suppresses confirmation prompts for command execution.
For example, if the command to remove the IP is Remove-NetIPAddress -InterfaceAlias Ethernet0 -confirm:$False, it confirms that Ethernet0 is the interface in question.
Next, assign a new IP address using:
New-NetIPAddress -InterfaceAlias {NAME} -IPAddress {IP} -PrefixLength {L} -DefaultGateway {GATEWAY_IP}Replace the placeholders with the actual values:
- {NAME}: Network interface name.
- {IP}: New IP address (like 192.168.1.10).
- {L}: Subnet prefix length (e.g., 24 for a 255.255.255.0 subnet).
- {GATEWAY_IP}: Default gateway (like 192.168.1.1).
For instance, the command might look like:
New-NetIPAddress -InterfaceAlias Ethernet0 -IPAddress 192.168.1.4 -PrefixLength 24 -DefaultGateway 192.168.1.13. Restart DHCP Client Service
The DHCP Client Service manages automatic IP address assignments within a network. To address issues with DHCP lease failures, restarting this service may help. Execute the following command in PowerShell:
Restart-Service DhcpClientAfter restarting the service, check if the error persists. If the problem continues, you may also try resetting the Winsock protocol with the command:
netsh winsock resetThese approaches should assist in resolving the issue of Windows Server failing to release DHCP leases.
For further guidance, consider investigating related errors and configurations regarding DHCP services.
Hudson Valley Host is premier provider of cutting-edge hosting solutions, specializing in delivering a seamless online experience for businesses and individuals. We offer a comprehensive range of hosting services, including Shared Hosting, VPS, Dedicated Servers, and Colocation. With 24/7 technical support, robust security measures, and user-friendly control panels, we empower clients in managing their online presence effortlessly. Hudson Valley Host is your trusted partner in achieving online success.
For Inquiries or to receive a personalized quote, please reach out to us through our contact form here or email us at sales@hudsonvalleyhost.com.


