To set up a DNS Server, it’s crucial to configure DNS Forward and Reverse Lookup Zones. This setup allows you to translate hostnames into IP addresses and vice versa. Below is a step-by-step guide for configuring both zones on Windows Server.
A Forward Lookup Zone acts like a phone book for computers. It translates domain names (like “example.com”) into IP addresses using A (Address) records. This is essential for web browsing, enabling devices to find the servers they need to communicate with.
Conversely, a Reverse Lookup Zone functions in reverse. It takes an IP address and determines the corresponding hostname using PTR (Pointer) records. This is particularly useful for network management and tracing IP addresses.
Before creating either zone, review your organization’s requirements. Different protocols and naming conventions must be adhered to, so ensure you have a clear plan before proceeding.
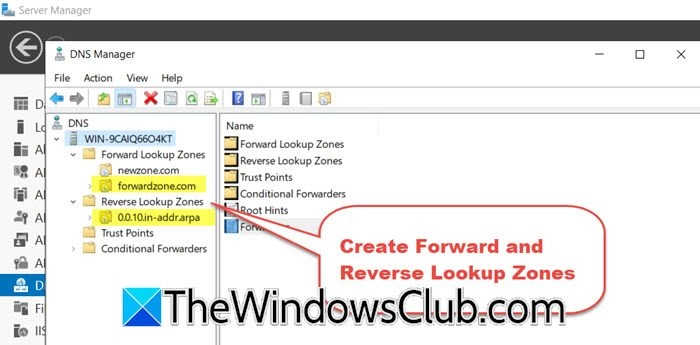
You can verify your Forward Zone by expanding the Forward Lookup Zones section.
You can check the newly created zone under the Reverse Lookup Zones directory.
Now you have successfully configured the DNS Forward and Reverse Lookup Zones on your Windows Server. For additional instructions, you may want to configure DNS and troubleshoot potential issues.
For reverse DNS lookup, you can utilize the nslookup tool. Open Command Prompt and type nslookup <ip-address>, replacing <ip-address> with the desired IP to find its associated hostname.
For further learning, you can explore materials on DNS Aging & Scavenging for managing DNS records.
Hudson Valley Host is premier provider of cutting-edge hosting solutions, specializing in delivering a seamless online experience for businesses and individuals. We offer a comprehensive range of hosting services, including Shared Hosting, VPS, Dedicated Servers, and Colocation. With 24/7 technical support, robust security measures, and user-friendly control panels, we empower clients in managing their online presence effortlessly. Hudson Valley Host is your trusted partner in achieving online success.
For Inquiries or to receive a personalized quote, please reach out to us through our contact form here or email us at sales@hudsonvalleyhost.com.