Though it might appear that virtual machines (VMs) have existed for ages, their integration into Microsoft environments began with the release of Hyper-V in Windows Server 2008. It wasn’t until the technical preview of Windows 8 in May 2012 that Hyper-V and its VMs debuted in a desktop version of Windows.
Since then, Hyper-V VMs have accounted for about 10% of all VMs used worldwide—a significant figure considering the extensive utilization of VMs in cloud computing, which accounts for billions of uses.
Windows 11 offers various benefits for users and administrators to operate VMs on personal computers, far removed from the vast scales observed in cloud environments.
In Windows 11, Microsoft has introduced two tools designed for crafting Hyper-V VMs. This article will explore the background of these tools, how they are utilized, and the limitations they present.
Hyper-V represents a type of hypervisor, which is essentially software designed to create, operate, and manage multiple virtual machines on a physical host. It allows an admin to establish and monitor the attributes of these virtual machines, which are encapsulated by the hypervisor.
The characteristics defined for these virtual machines can include virtual processors, memory, storage, network connections, and an operating system. These virtual resources are utilized by the VMs to execute commands and operations, maintaining each VM in a segregated and distinct operating environment.
Viewed from within, a VM operates Windows just like on a typical computer. However, from the outside, the hypervisor governs interactions with the host operating system and mediates between the VM’s virtual resources and the host’s actual resources.
Computers equipped with Hyper-V Manager, Windows’ integrated hypervisor, or other virtualization software such as VMware Workstation, are known as host PCs. On these hosts, virtual machines operate as clients to the hypervisor.
Because a Windows VM represents an instance of a virtualized Windows operating system, Windows 11 VMs inherit the system requirements for Windows 11 itself. Hyper-V adds additional items to this list (they’re preceded by an asterisk):
Today, there are two ways to set up a Hyper-V VM in Windows 11: the standard way, and a developer-oriented way. The standard way uses Hyper-V Manager to create and configure VMs. The developer-oriented way, which made its debut in April 2024, uses a Microsoft utility named Dev Home (Preview). It’s available from the Microsoft Store.
As you will see, the developer-oriented way is simpler and less fraught with obstacles than the traditional one. But there’s a catch, as I’ll explain in the Dev Home section below.
Although Hyper-V is included with modern Windows versions, it is not enabled by default. Thus, you must first turn Hyper-V on using the Windows Features element from Control Panel (Control Panel > Programs and Features > Turn Windows features on or off).
Click the top-level Hyper-V item. When you do so, you activate both the Hyper-V platform itself (Hyper-V Platform) and Hyper-V Management Tools to manage VMs through the Hyper-V Manager or some remote access methods such as the Remote Desktop Connection, also known as mstsc.exe.
I usually also activate the item labeled Windows Hypervisor Platform. Once you have made these selections, click OK and Windows will proceed to install and enable them for you.
Windows Features handles the necessary tasks to activate and configure Hyper-V Manager and enable support for running Hyper-V VMs. When this process is complete, Windows will notify you with the message: “Windows completed the requested changes.” You are also prompted to reboot your computer to finalize the setup.
Restarting your computer is essential before you can begin using the Hyper-V platform. This can easily be accomplished by hitting the “Restart now” button displayed on the screen.
Click “Restart now” to prepare your PC for Hyper-V VM operations!
After restarting your system, a quick search for “hyper” in the Start menu will show that Hyper-V Manager appears as the top result. Once your machine has rebooted, Hyper-V Manager is prepared for use.
Launching Hyper-V Manager directly from the desktop it’s hosted on—often referred to as a local run—is generally the simplest method to configure a Hyper-V VM. Initially, when Hyper-V Manager is opened for the first time, you will notice that it displays no virtual machines (VMs) yet, indicating that it hasn’t been configured with any VMs to manage.
Figure 4: When run for the first time, Hyper-V Manager shows precisely nothing.
Ed Tittel / IDG
If you click Quick Create, the top item in the right-hand menu you can soon remedy this situation. By default, Microsoft provides pointers to various predefined runtime environments, including evaluation versions of Windows 10 and 11 aimed at developers and (until early July) three different Long Term Servicing (LTS) branches for Ubuntu Linux (which may be freely offered to anyone who’s interested).
The right-hand side of Figure 5 shows the details for the “Windows 11 dev environment” item, an evaluation copy worth installing as a short-lived example. Select the OS you want to install and click Create Virtual Machine.
Figure 5: Select Windows 11 dev environment (left), then click Create Virtual Machine (lower right).
This downloads a ~21GB Windows image file. (On my Lenovo P16 Mobile Workstation, a 12th-Gen x86 platform, that took about 5 minutes to complete, including image verification.) Then, Hyper-V Manager creates a VM, extracts the virtual boot/system disk, verifies the image again, and completes (this takes another 5 minutes or so), as announced in Figure 6. Click Connect to hook up the new test VM inside Hyper-V Manager.
Figure 6: VM successfully created. Next step: click Connect.
What happens next is that Hyper-V Manager opens a virtual machine window. You must start the VM to turn it on, as outlined previously. If you were using an ISO (which will be covered shortly), this is when the process of installing Windows inside the VM would occur.
Before you can interact with a VM, you must start it up: click Start!
But because Microsoft has conveniently provided a predefined, ready-to-use VM for this development environment, clicking Start initiates a boot-up process labeled “Getting ready” that lasts about a minute. Once completed, you can access a Windows 11 desktop (username is User, and no password is required). This marks the initiation of your first Hyper-V VM!
Although the setup requires at least 15 minutes, it’s remarkably quick and straightforward for VM creation. The VM appears within a Hyper-V Virtual Machine Connection window, verifying its active status as illustrated in the window’s title bar.
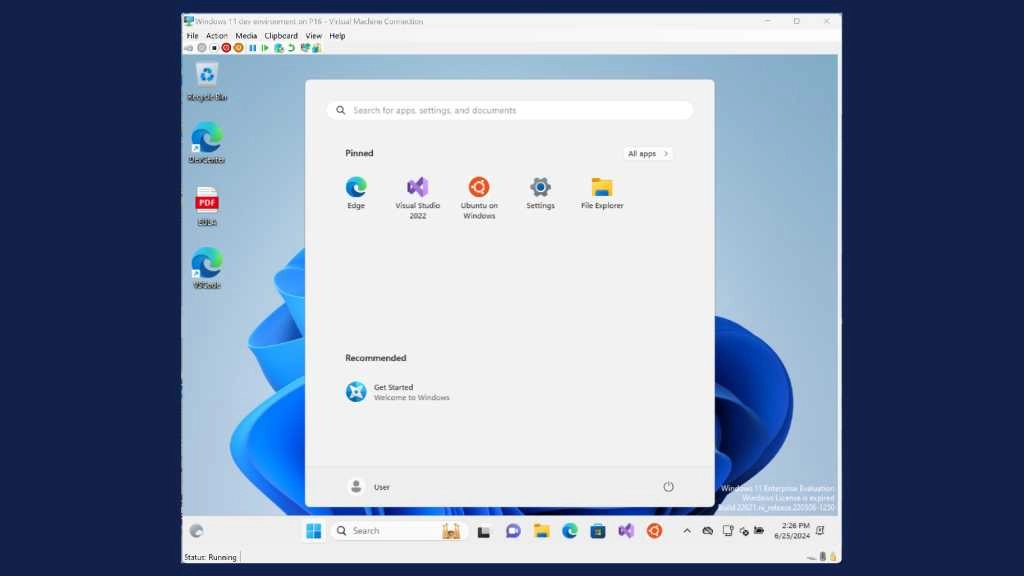
Figure 8: The Windows 11 Dev Environment VM start menu highlights a developer-centric layout.
Creating a virtual machine using an already existing virtual hard disk (.vhdx file and relevant configurations) is a straightforward process. It essentially involves activating and running a virtual machine that is pre-configured and almost ready for use.
Another method for VM creation can be seen in the screenshot labeled as Figure 5, where one can click on the “Local installation source” button located on the bottom left of the “Create Virtual Machine” interface. This option allows you to browse through local drives and select an ISO — a type of disc image file utilized for installing Windows — to initiate the VM setup. (The best places to find Windows ISOs offers information on reliable sources for obtaining these files.)
This method enables the selection of any version of Windows, but involves a lengthier process due to the OS installation into a new VM, requiring more effort to ensure everything is configured correctly.
After selecting the Local Installation source button as shown in Figure 5 and navigating to the E: drive where a May 30 Windows 11 Insider Preview ISO is stored, this specific ISO was chosen for setting up a Hyper-V VM. The outcomes of this selection can be seen in Figure 9, where it is necessary to click Create Virtual Machine (located at the bottom right) to continue with the setup using a local ISO.
By targeting an ISO through File Explorer, you open VM creation options to whatever the file system can see.
This time when you click Create Virtual Machine, the Hyper-V wizard works from the ISO. Because I accepted all defaults, this VM shows up as “New Virtual Machine” in Hyper-V Manager. I right-clicked that string in the top center pane (“Virtual Machines”) and selected Rename from the pop-up menu to call it “Win11.26100.” It appears as such thereafter.
Renamed to Win11.26100 (for its primary Windows 11 build number), the new VM must now be installed.
Because we’re initiating the installation from an ISO file, we must first install this OS image so that it can function as a VM. The timing is crucial here: after clicking Connect, then hitting the Start button, you must promptly press “any key” to activate the installer. Delaying may lead to a PXE boot message appearing, stopping the installation process. Therefore, quick action is essential.
Once successful, the Windows 11 setup screen will appear, prompting you to “Select language settings”. From this point, the process simply involves following the standard steps of the Windows installation. Note that a valid product key is necessary for the version of Windows being installed.
An issue will likely arise by default: a warning stating, “This PC doesn’t currently meet Windows 11 system requirements.” This occurs because the Hyper-V Manager Quick Create does not automatically activate the Trusted Platform Module (TPM), which is essential hardware-based security technology for handling cryptographic keys and other sensitive data.
Turn off the VM by selecting Action from the top menu and then choosing Turn off. On the main Hyper-V Manager screen, select your VM (in this example, Win11.26100) and click the Settings button located at the bottom right. This action opens the Settings page for your Win11.26100 VM. Navigate to the Security section. You will observe that although Secure Boot is enabled, the TPM is not. Check the Enable Trusted Platform Module box, and then click Apply followed by OK.
This setting adjustment is critically important as Windows 11 installation requires TPM, which Hyper-V Manager does not enable by default, necessitating manual activation.
Following this setup, clicking Connect will allow you to proceed with the installation process without interruption.
Once the process is complete, which took approximately 40 minutes on my powerful P16 Mobile Workstation, you will observe a typical Windows in a VM window. There you have it: another VM added to your Hyper-V collection.
Besides the Quick Create option, Hyper-V Manager also provides a New > Virtual Machine option. This method offers enhanced access to a variety of settings and choices available for configuring a new Hyper-V VM.
The New > Virtual Machine choice allows for more detailed control when setting up a new VM.
Using this option opens a New Virtual Machine Wizard that walks you through the entire VM specification process. It allows you to specify a name, choose a file system location, select a VM generation, assign memory, and handle networking, virtual hard disk, and installation details. Unfortunately, managing the TPM setting is still a manual task as described earlier.
The New Virtual Machine Wizard guides users through VM creation and settings in a detailed step-by-step manner.
In the subsequent screenshots, I will demonstrate the creation of a new Windows 11 VM for version 24H2 (Build 26100.863) which was downloaded from the Insider Preview downloads page. The screen to specify the name and location shows the VM being named Win11.24H2 and using the default storage location for the virtual hard disk file.
Figure 14: The VM name is set to Win11.24H2, after which you click Next to continue.
By default, all Hyper-V VMs are designated Generation 1. Since Generation 1 doesn’t support Windows 11 VM requirements, you must select the Generation 2 radio button to install a Windows 11 VM, as shown in Figure 15.
Figure 15: Click the Generation 2 radio button to meet Windows 11 VM requirements.
The next step is to allocate 8GB (8,192MB) of RAM, which is double the default amount, for the Win11.24H2 virtual machine.
This time, please configure the virtual machine with 8GB of RAM instead of the usual 4GB.
The next step is to select the Default Switch option for the Connection field under the Configure Networking heading, as mentioned before. It’s essential to remember that the default selection is “Not connected,” indicating that the VM will not have network capabilities. Choosing Default Switch allows the VM to access the networks available to the host PC. If other switches exist in your host configuration, they will be listed in the dropdown menu for this VM setup, and you can select any of them if preferred.
If network and internet connectivity is required for the VM, selecting Default Switch is advisable.
The following task involves connecting a virtual hard disk to the VM. The default location previously discussed will be used here as well. There are alternative options such as “Use an existing virtual hard disk,” which provides the VM with a pre-configured environment, and “Attach a virtual hard disk later,” which permits completing the VM setup without immediately allocating or connecting a virtual hard disk. Details for Win11.24H2.vhdx can be referred to for further information.
Figure 18: This represents the default allocation (127GB) for Hyper-V VM virtual hard disks.
Next comes the exciting step: adding a filesystem path for an ISO and determining the method (or lack thereof) for its installation. It reads “Installation Options” on the left-hand side. For this instance, we’ll input the ISO I obtained from the Insider Preview downloads page, directing the system to install the OS from this file, as illustrated in Figure 19.
Figure 19: The selected radio button instructs the installer to locate a specific Windows 11 ISO file.
At this point, the wizard is finished, so click Summary on the left to show your work so far. It will show all the settings you’ve made. Click Finish to complete the VM creation process. Then, you’ll return to Hyper-V Manager, where you now see a VM named Win11.24H2 in the upper center “Virtual Machines” pane.
The new VM, Win11.24H2, is turned off. That’s good!
It might be possible to initiate the installation of Win11.24H2 at this point. However, it’s crucial to enable TPM within the Security settings of your new VM, as explained prior to Figure 11. Upon configuring this, you’ll be prepared to start the installation of the Windows 11 OS image, according to the earlier descriptions in this narrative.
With the introduction to Hyper-V Manager and the creation of VMs completed, we now proceed to delve into more complex and nuanced details.
In essence, every VM operates remotely since there are no tangible peripherals such as a mouse, keyboard, or monitor connected directly to it. Instead, you must map these virtual counterparts to their respective physical counterparts. This setup extends to not just the peripherals but also processors, memory, storage, networking, and so forth. It’s important to note that one of the key advantages of VMs is their capability to support seamless access over any network connection to the supervising hypervisor.
However, complications can arise when using the Windows remote desktop protocol (RDP) through applications like Remote Desktop Connection or the Remote Desktop app, particularly when paired with Hyper-V. Here, I’ll outline the challenges that go beyond the already identified issues, like triggering the Windows Installer for an ISO-based installation or needing to activate TPM to ensure the installation proceeds smoothly.
For starters, you can’t start a new Windows 11 VM from inside an RDP session, as it seeks to read and mount the targeted Windows 11 ISO to run its Setup.exe. This task can only be performed from a physical login at the host PC, not via an RDP session. If you attempt to initiate this process in an RDP session by clicking the Start button, the VM will fail to boot and run Setup.exe.
Moreover, if you click Start, the VM will display a black screen instead of initiating the Windows 11 installation. You need to shut down the VM (click Action on the top menu, then Turn Off). Afterwards, activate the VM by clicking the Start button from the host PC directly, either using a local mouse or keyboard. Once Setup.exe is operational, the RDP session will show the VM correctly, presenting the initial screen of the Windows 11 installer.
Once Setup.exe is functioning, you can connect to the VM via RDP if desired.
The next tricky issue arises when you click on the Install now button. At this point, you’ll realize that it’s not possible to copy and paste the Windows activation key into the activation screen. This function is only available in an enhanced session within RDP, which cannot be activated until Windows 11 installation is complete. In addition, adjusting the Windows Hello login settings might be necessary to address this, as these settings are turned on by default and do not support enhanced session’s copy-paste capabilities.
At the key prompt in the Activate Windows screen, manual entry of the key is your only option due to the limitations discussed.
You need to manually enter the 25-character code (consisting of both letters and numbers) for your specific Windows key. Alternatively, you can opt for the 30-day evaluation version of the Windows 11 developer environment, which does not require a key but offers limited access time.
But there’s one more RDP challenge to address: you cannot access your new desktop until you deselect the “Enhanced session” option in the View menu of the RDP session. After doing this and logging in, navigate to Settings > Accounts > Sign-in options, and disable the toggle found under “Additional settings” labeled For improved security…. You can then reactivate the enhanced session to log in using a password or PIN.
Note that the “Enhanced session” in the View menu should be unchecked. Disable the toggle under “Additional settings.” Afterwards, re-activate the option to enable cut and paste functionality in RDP.
With the groundwork laid earlier in this guide, you now have functional Windows 11 VMs, mostly configured with the defaults from Hyper-V Manager. By establishing the straightforward, default-configured Win11.26100 VM using Quick Create, and a slightly modified Win11.24H2 VM through the New Virtual Machine Wizard, you gain valuable insight into the operations and standard setups of VMs.
Default settings for virtual machines (VMs) are influenced by the specifications of the physical PC hosting the Hyper-V Manager. For instance, if the physical machine has limited cores, RAM, or storage, the VMs created will have resources matched accordingly, relative to machines that are more robust. An example of a high-end setup would be a Lenovo P16 Mobile Workstation with 24 cores, 64GB of RAM, and approximately 4 TB of total storage, including a 2 TB system drive.
Generally, the out-of-the-box configurations selected by Hyper-V Manager for its VMs tend to perform adequately. Those experienced with Hyper-V can tweak these settings upwards or downwards, although reducing specs from the default may only be justified in specific scenarios or on less capable physical machines.
For more info on Hyper-V and VMs: Microsoft Learning provides a complimentary 45-minute module titled “Configure and Manage Hyper-V virtual machines.” Moreover, the Windows 11 Forum features a comprehensive series of tutorials under its Virtualization section, covering a broad spectrum of VM-related topics across 54 tutorials.
With the launch of version 0.13 of the Dev Home (Preview) on April 23, 2024, Microsoft introduced the concept of “Environments” to their developer toolbox, promoting enhanced capabilities for creating, managing, and configuring Hyper-V VMs and Microsoft Dev Boxes, as detailed in the version 0.13 release notes on GitHub.
Many readers may be indifferent to Dev Boxes, a service provided by Azure aimed to boost developer productivity by offering self-service access to preconfigured, project-oriented development environments in the cloud. A subscription to Azure is required to utilize this service. However, if those readers are considering using Hyper-V VMs, they should take a keen interest in its VM capabilities, which necessitate Windows 11 22H2 or a later version.
Having experienced various challenges as outlined previously that can hinder the creation and use of VMs through Hyper-V Manager, I was curious to see if Dev Home (Preview) could offer a smoother experience. I intentionally conducted an RDP session to operate Dev Home on a remote PC. Within Dev Home, I accessed the Environments section, marked distinctly with a small blue highlight bar on the left, as depicted in a visual illustration not shown here.
The representation typically shows existing VMs along with an option labeled “New Virtual Machine.”
Ed Tittel / IDG
Dev Home successfully loaded all previously defined virtual machines on the P16, indicating their statuses such as Stopped, Running, or Saved, suggesting these are recognized as “Environments” within the application. More importantly, by clicking the Create Environment button located at the upper right, I was quickly guided through the process of setting up a new Hyper-V VM:
This screen indicated that the Microsoft-provided “Windows 11 dev environment” has been selected as the source for the new virtual machine.
After initiating the Create Environment process, expect some delay. Dev Home needs to download the substantial Windows 11 dev environment, which is over 20GB, and then proceed to unpack its contents. On the P16 Mobile Workstation, this entire operation lasted approximately 15 minutes, with Dev Home displaying the progress, for instance showing the download at 76% completion.
Progress in downloading the ISO for the Windows 11 dev environment stands at 76%.
When the extraction process ends, the ISO is mounted and the VM ready to launch. You’ll see Environment information for your new VM (NewVM2, in this case) as described above. You must click the Launch button (far right) to start the VM installation process.
Click the Launch button to initiate the Windows installer for the VM’s OS.
When you do that, a small VM window opens to present you with a Start button to fire things off. Click that Start button!
Click the Start button to put Setup.exe to work to install the VM’s OS.
This starts the VM, which fires off the ISO image’s Setup.exe, at which point you’ll see a larger VM window labelled Hyper-V and a circular progress indicator. Then, you’ll be asked to size the VM window for further display (I recommend at least 1680 x 1050). At this point, a login window for a generic “User” (no password) appears. Remarkably, this took two minutes or less to complete. Click Sign in to get to the desktop.
Because the predefined User account requires no password, click “Sign in” and you’re done.
The next thing you’ll see is the NewVM2 desktop, a mostly bare-bones Windows 11 install that also includes Visual Studio 2022 and Ubuntu on Windows. It’s running the current build as I write this for an Enterprise Evaluation (22621.3447) version. I also checked: you cannot use a valid Windows 11 Enterprise key to activate this install (it rejects all keys).
But here we are, having installed a working Hyper-V VM for Windows 11 from start to finish inside an RDP session! Thus, the Dev Home approach completely sidesteps all gotchas one encounters when using Hyper-V manager, to wit:
There’s just one problem: Dev Home environments don’t let you grab an arbitrary local ISO on a drive. You can only use Environments that Microsoft makes available (these are essentially the same as the “gallery images” shown in Figure 9 earlier in this story).
For any other Windows images you might want to run as VMs, you must use Hyper-V Manager and its quick or slow create processes — that is, unless Microsoft responds to my feature request to add access to local ISOs to Dev Home’s existing image options when creating a VM.
What I learned from digging into Dev Home and its capabilities — especially when using RDP — is that it’s entirely possible for Microsoft to update and rationalize its Hyper-V VM creation process. Whether or not they choose to do so is up to them. I certainly hope they’ll figure this out, and do just that.
Ideally, Microsoft would update Hyper-V Manager to be compatible with Windows 11. Additionally, adding local ISO access for image selection in Dev Home would be beneficial. While I would appreciate either improvement, enhancing a VM created in Dev Home via Hyper-V Manager’s extensive settings is always a viable workaround. However, seeing both upgrades would be wonderful, though I remain skeptical about their quick implementation.
Hudson Valley Host is premier provider of cutting-edge hosting solutions, specializing in delivering a seamless online experience for businesses and individuals. We offer a comprehensive range of hosting services, including Shared Hosting, VPS, Dedicated Servers, and Colocation. With 24/7 technical support, robust security measures, and user-friendly control panels, we empower clients in managing their online presence effortlessly. Hudson Valley Host is your trusted partner in achieving online success.
For Inquiries or to receive a personalized quote, please reach out to us through our contact form here or email us at sales@hudsonvalleyhost.com.